Management (LMS)


The Management (LMS) utility is available to teachers, school and district administrators and allows educators to build their rosters, manage classes and students, create MyQ assignments and iKnow Math assessments, and communicate with students via the iLearn Messenger.


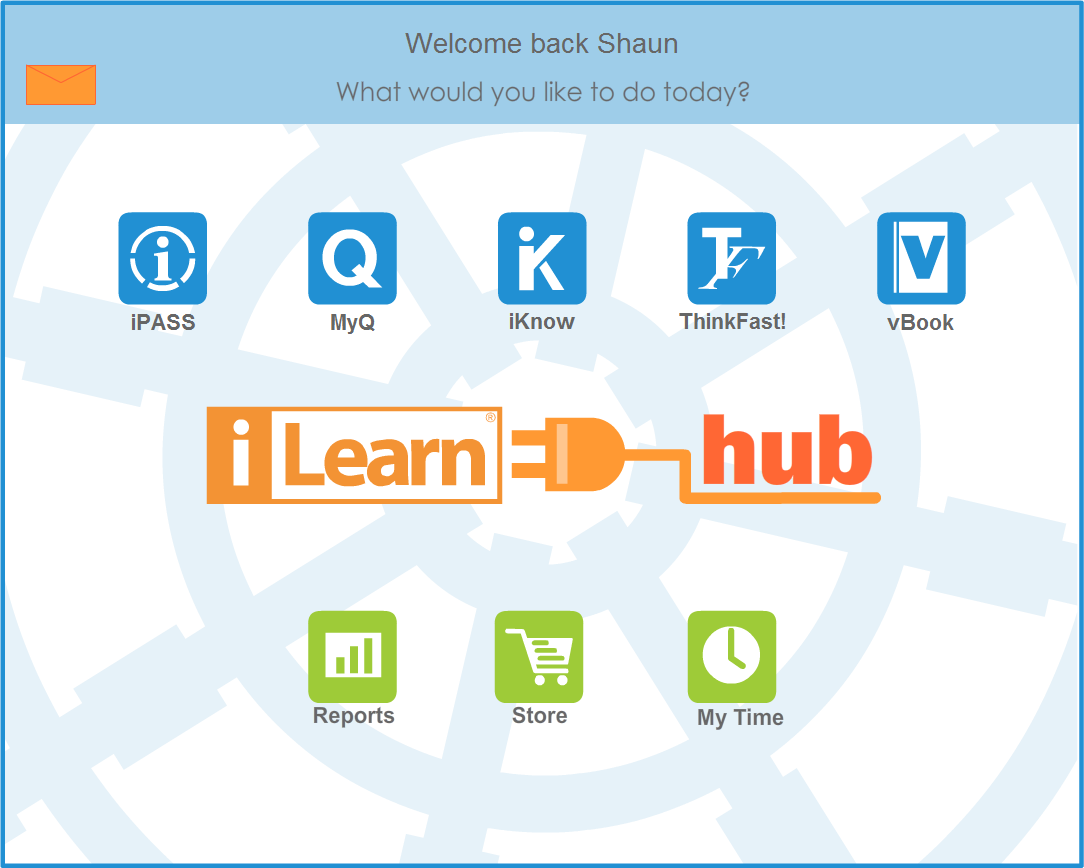
The Purpose of Management (LMS)

The Management utility is for completing administrative tasks and managing accounts. It allows teachers, school and district administrators to create classes, create students, create Virtual Views, and access the MyQ and iKnow Managers. The Management utility also allows teachers to access the iLearn Messenger to quickly send messages to students and iLearn Support, and to receive messages from students and iLearn Support.


Access Levels

The Management utility can be accessed by teachers, school and district administrators.

Teachers can view their classes and students, and add additional classes, Virtual Views, and new students.

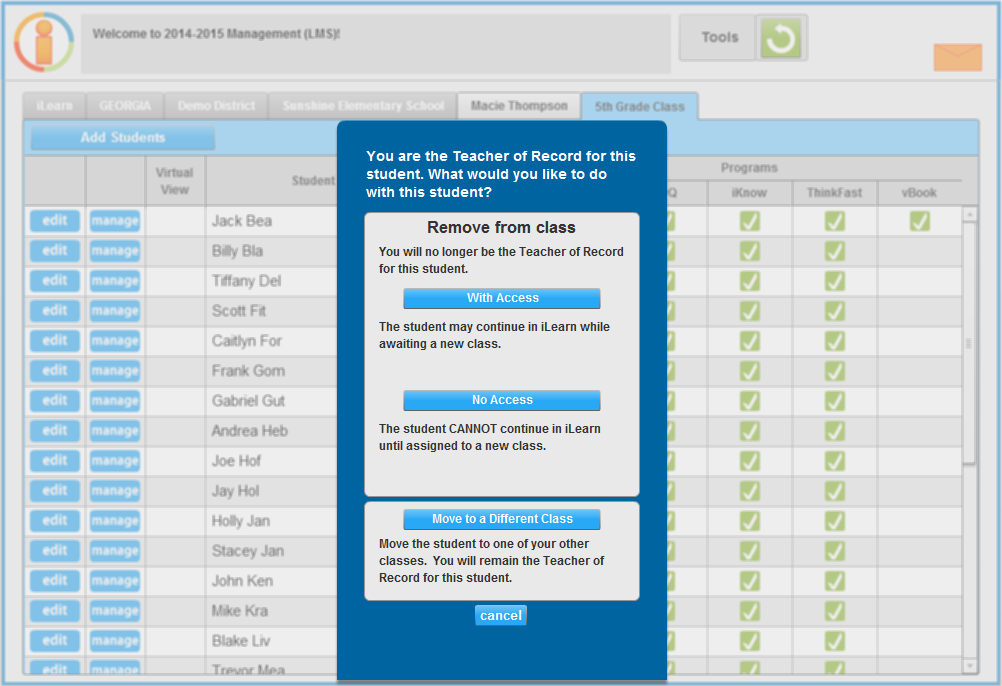
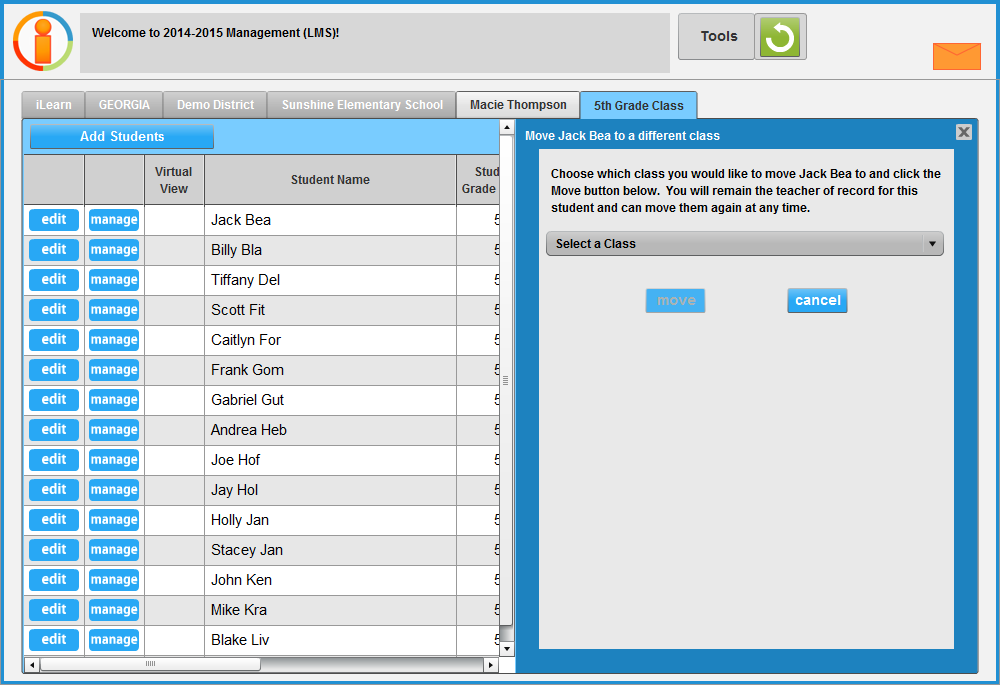
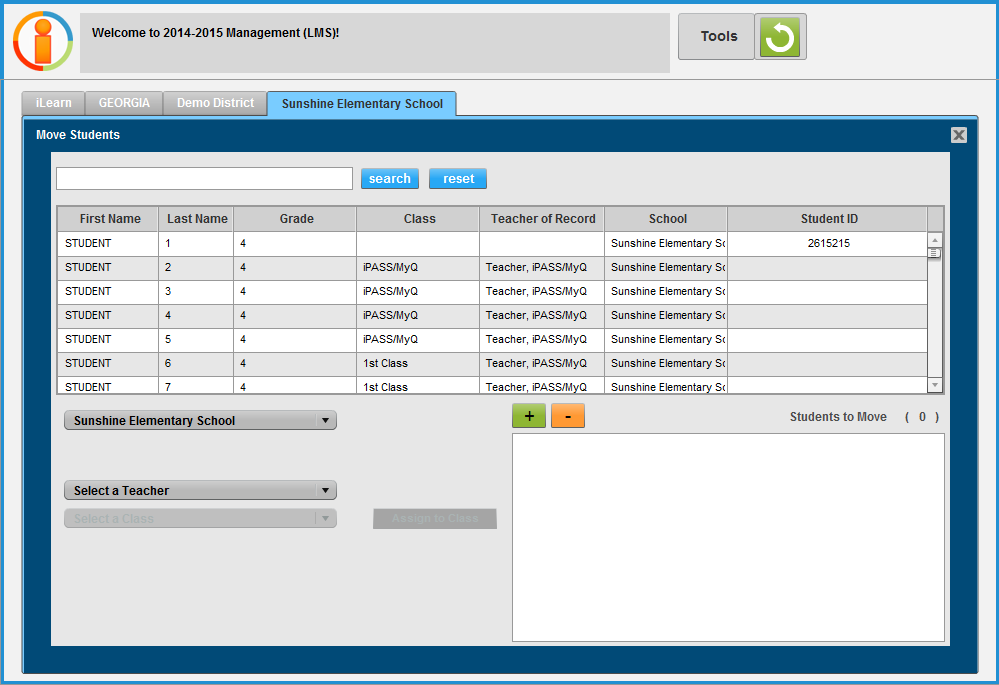
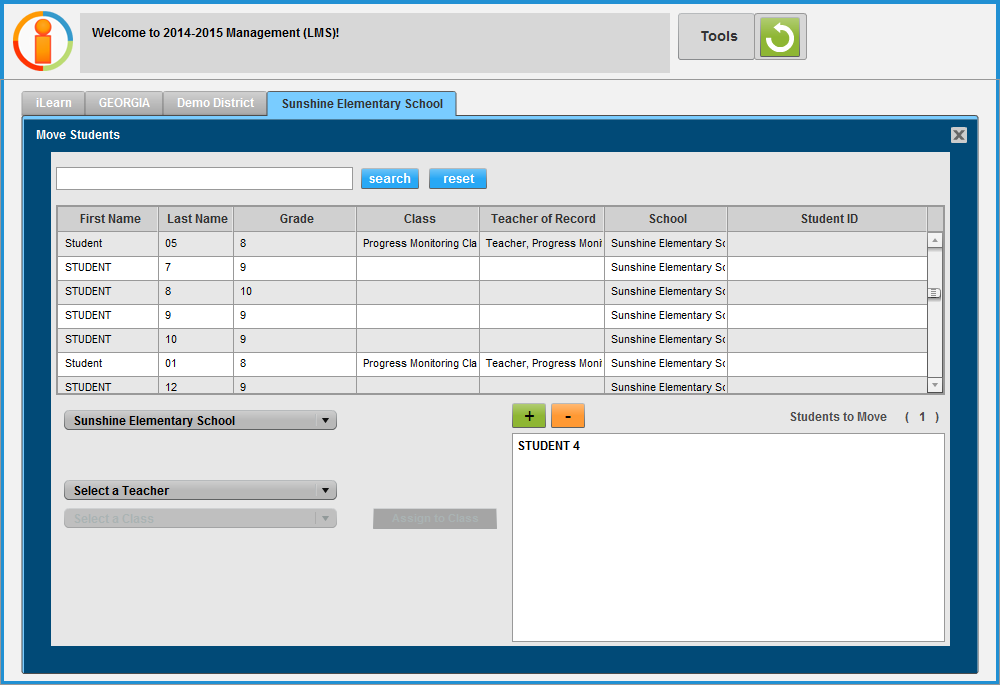
School administrators can view all teachers, classes, and students in their school, and can move students from one Teacher of Record to another within the school.

District administrators can view all schools, teachers, classes, and students in their district, and can move students from one Teacher of Record to another in a different school.

To access the Management utility, log in at www.iLearn.com/login and click LMS hub icon next to “Management (LMS).”

iLearn Hub Teacher View

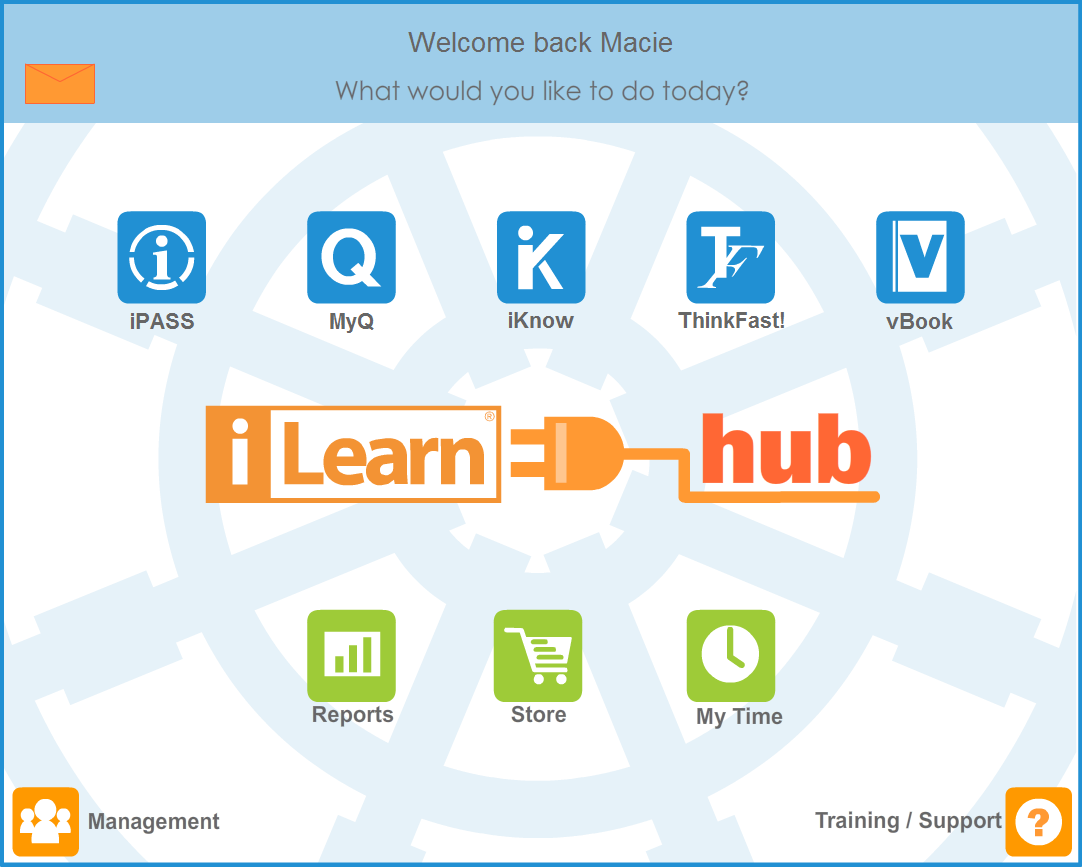
The Management utility launches in a new window.


Teacher View

Below is an example of a teacher view when first accessing Management:

LMS Teacher Tab Teacher View

Teachers view all of their classes, duration, grade level, period, class schedule type, and the number of students in each class.

By clicking LMS View icon 
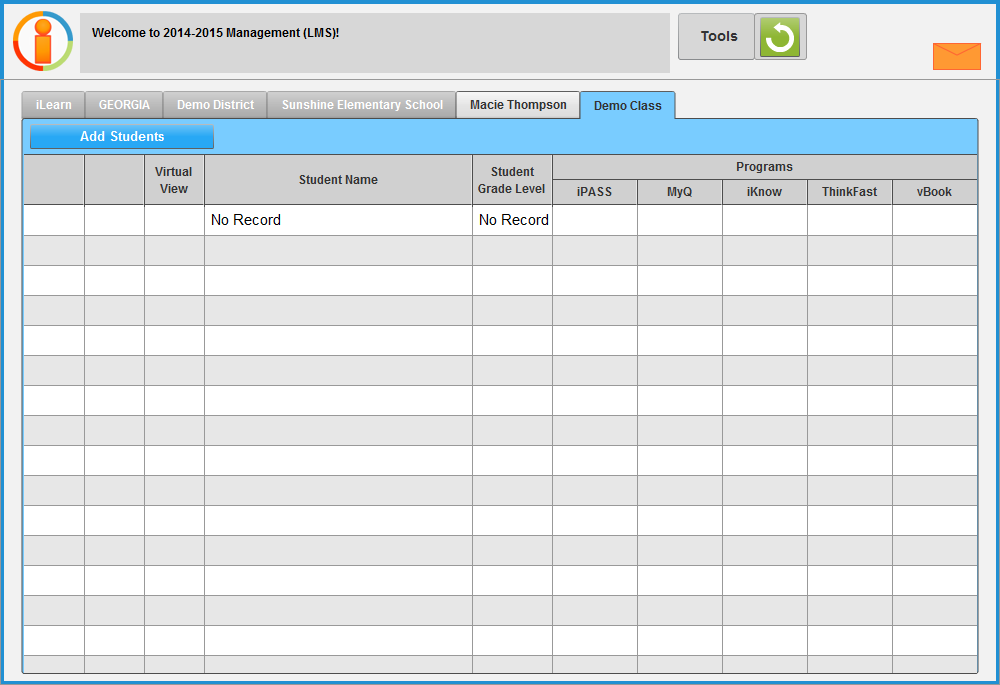
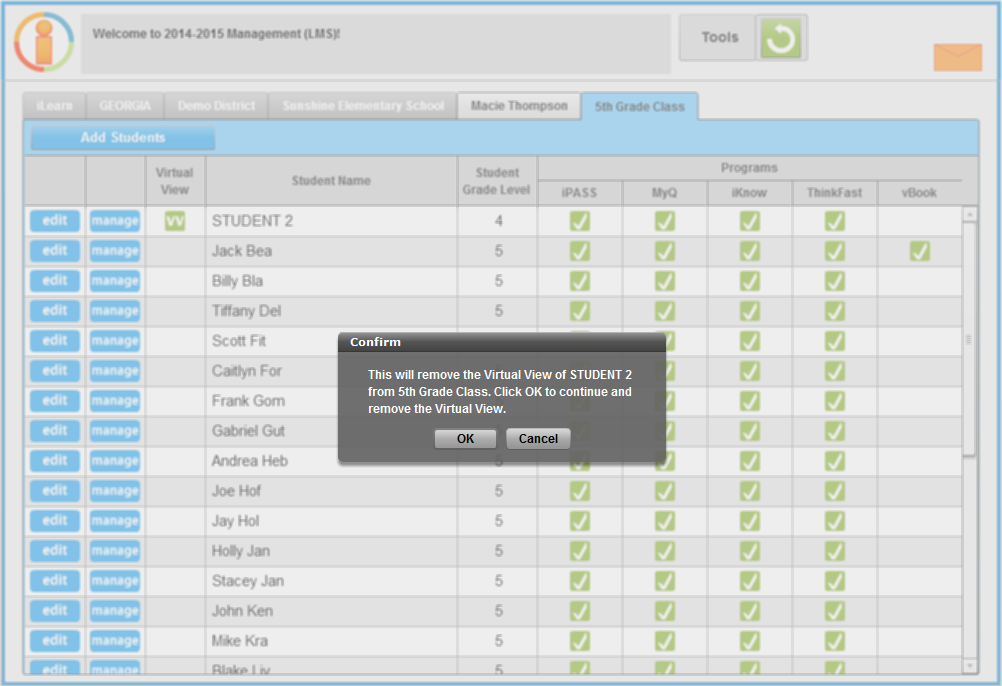
next to a class, the teacher views all students in the class:

LMS Class Tab Teacher View

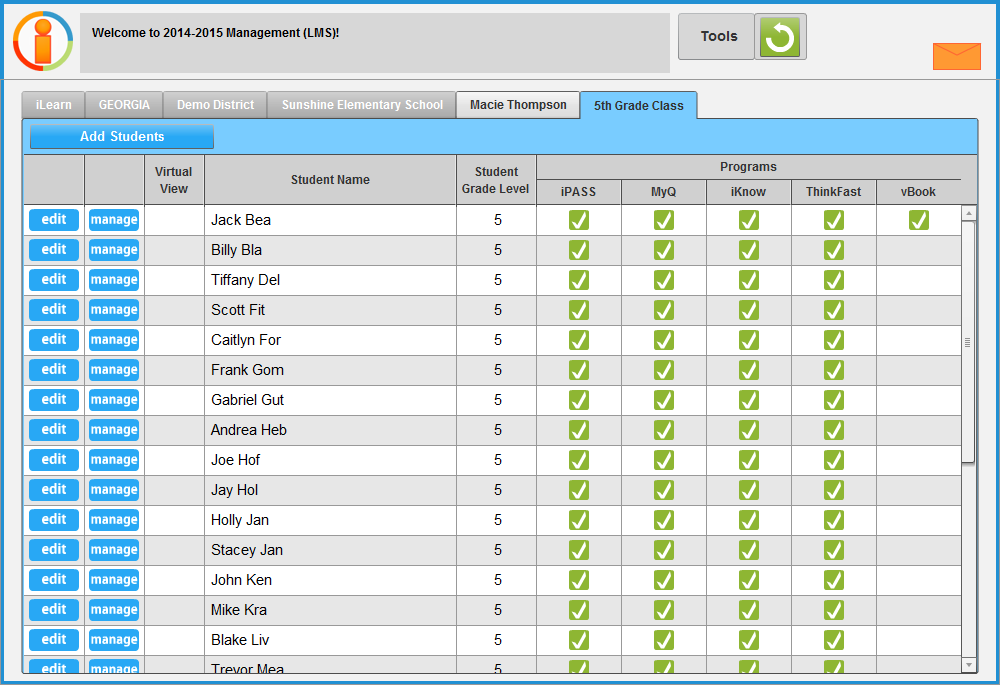
All students in the class are listed, as well as the programs available to each student. A “0” indicates that the student has access to the program. If nothing displays for a student under a program, the student does not have access.


School Administrator View

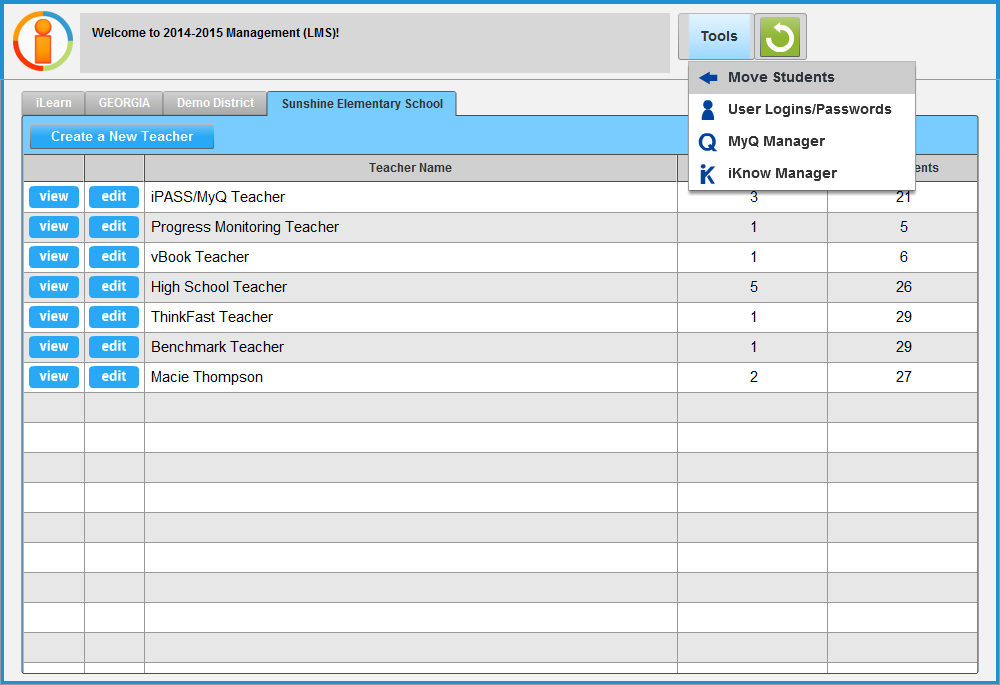
A school administrator sees all teachers in their school when first accessing Management:

LMS School Tab School Admin View

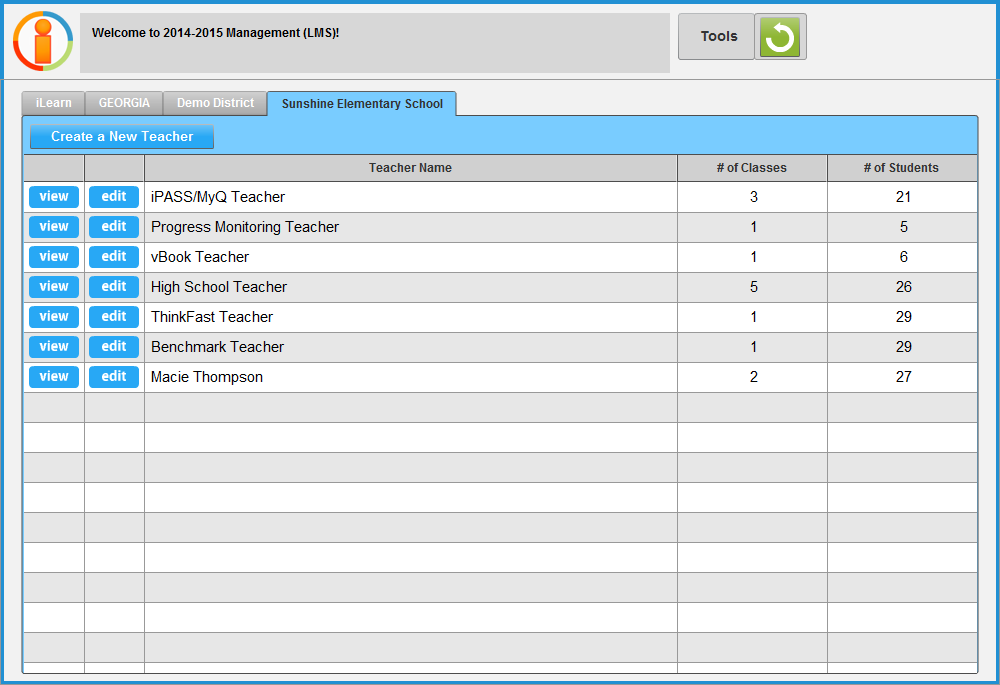
School administrators view teachers registered at their school, the number of classes under each teacher, and the number of students under each teacher.

School administrators click LMS View icon next to a teacher’s name to access the level the teacher sees when accessing Management.


District Administrator View

A district administrator sees all schools in their district when first accessing Management:

LMS School Tab School Admin View

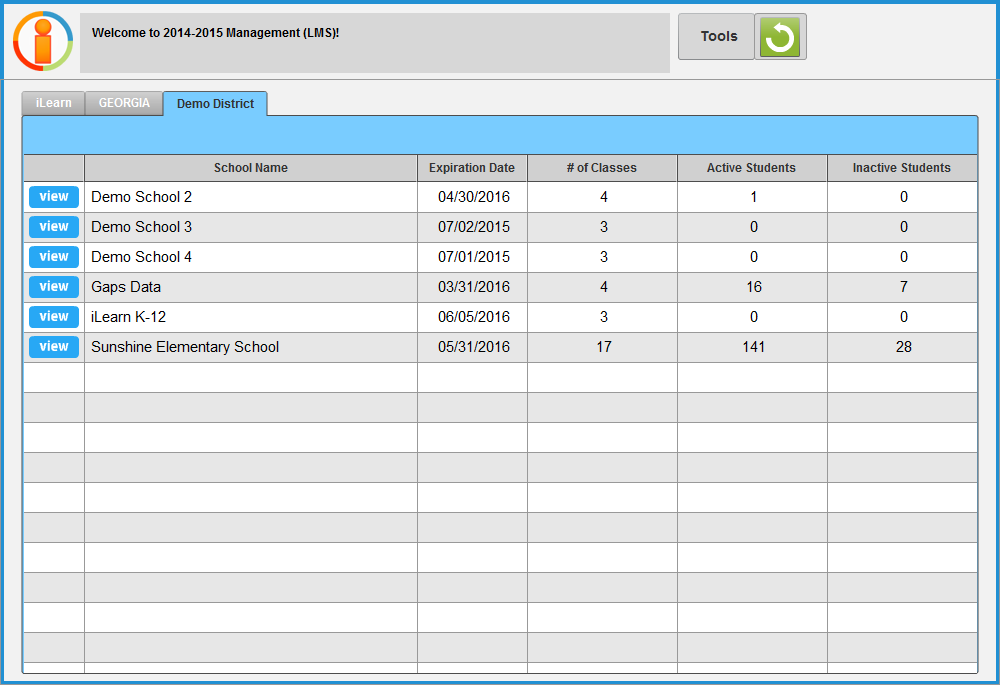
District administrators view the schools registered in their district, the expiration date of each school, the number of classes at each school, and the number of active and inactive students at each school.

District administrators click LMS View icon next to a school’s name to access the level a school administrator sees when accessing Management. They can then click view next to a teacher’s name to see the level a teacher sees when accessing Management.


All Levels

District administrators can navigate down to the view of a teacher by clicking LMS View icon next to a school, then clicking LMS View icon by a teacher’s name, and can even view all of the students in a class by clicking LMS View icon next to a class name. School administrators have the same ability.

The difference between the three levels is access: district administrators can access everyone in the district, while school administrators can access everyone in their school, and teachers can access their classes and students.

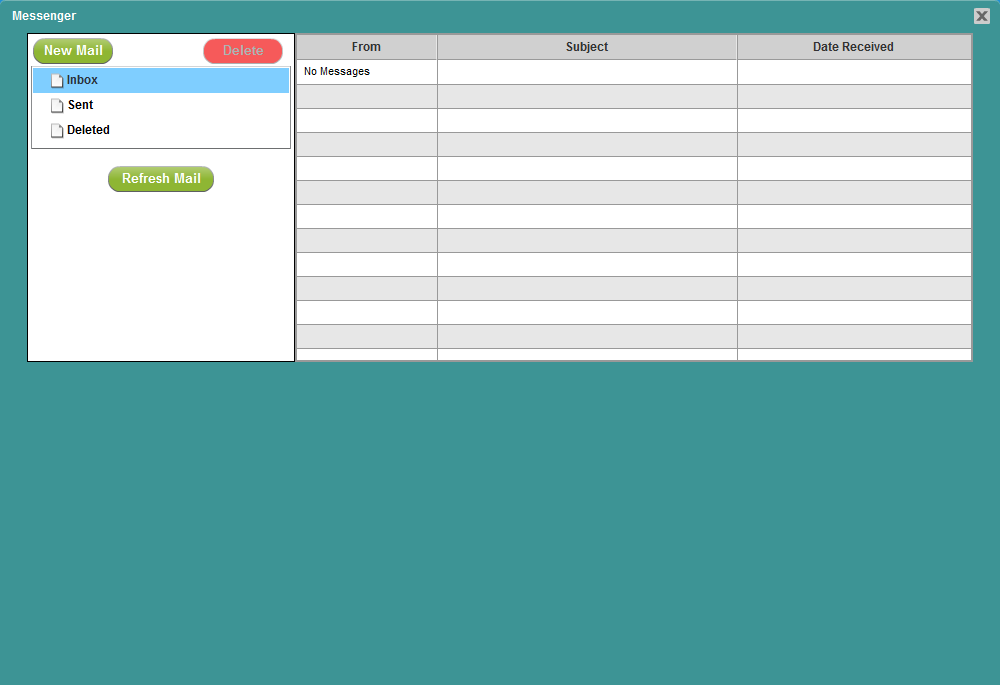
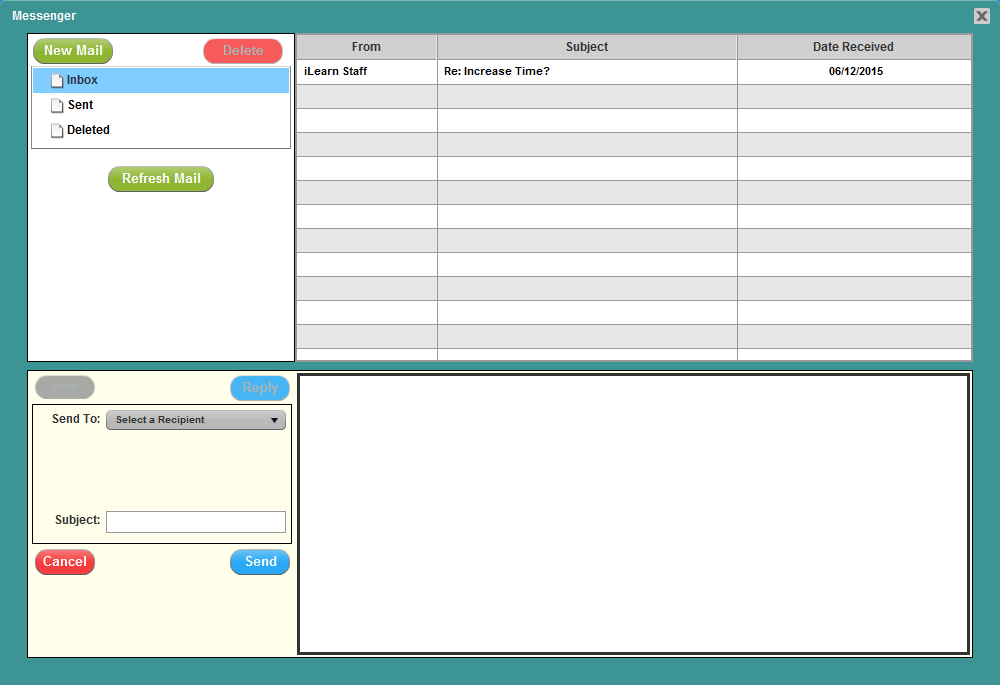
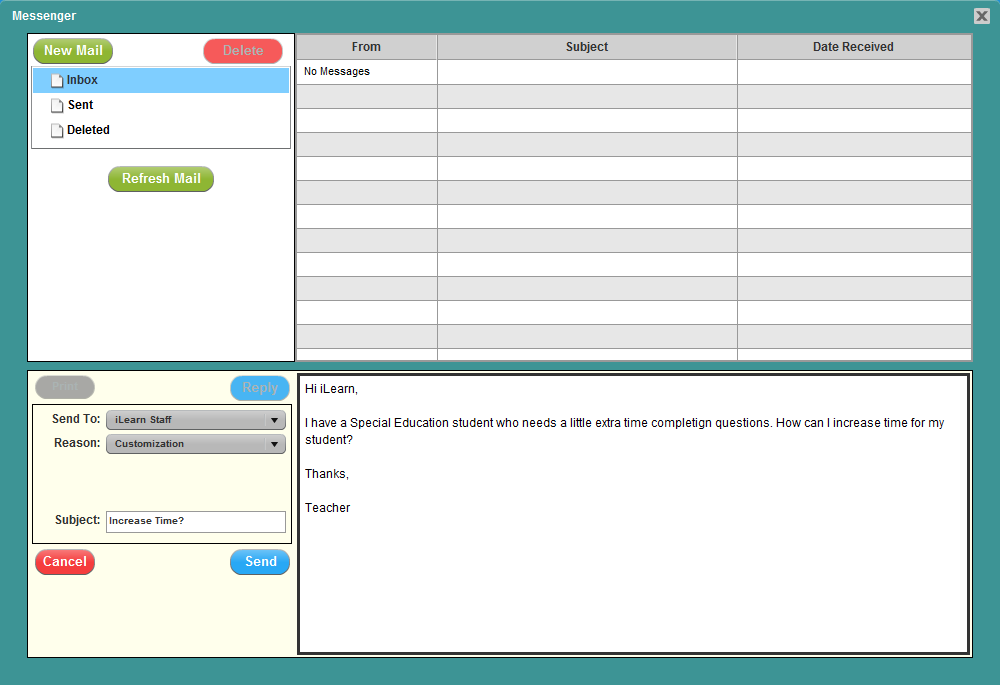
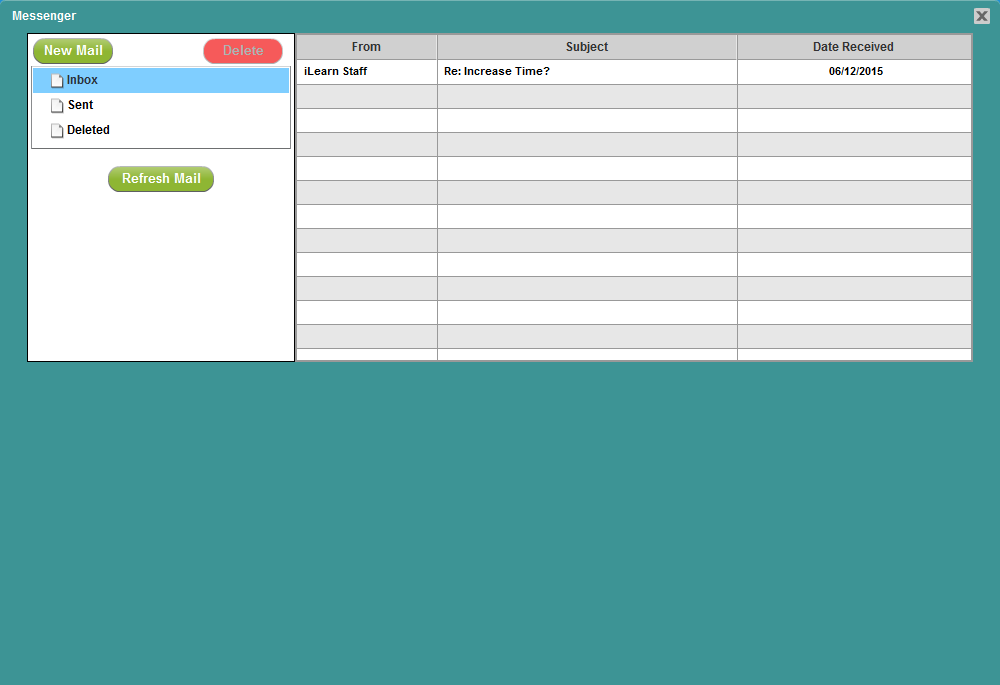
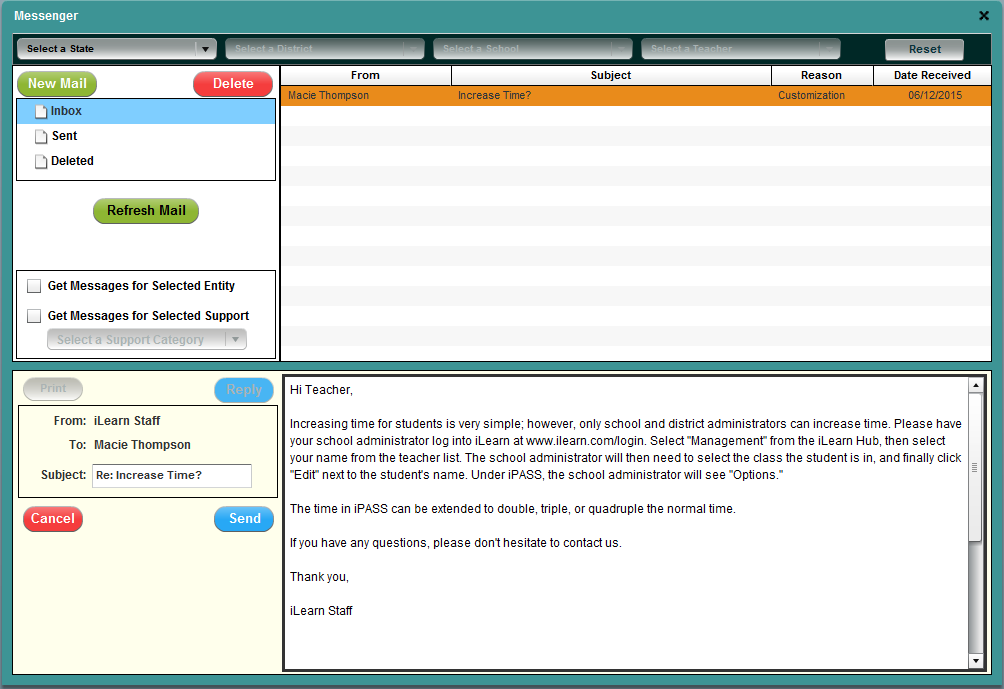
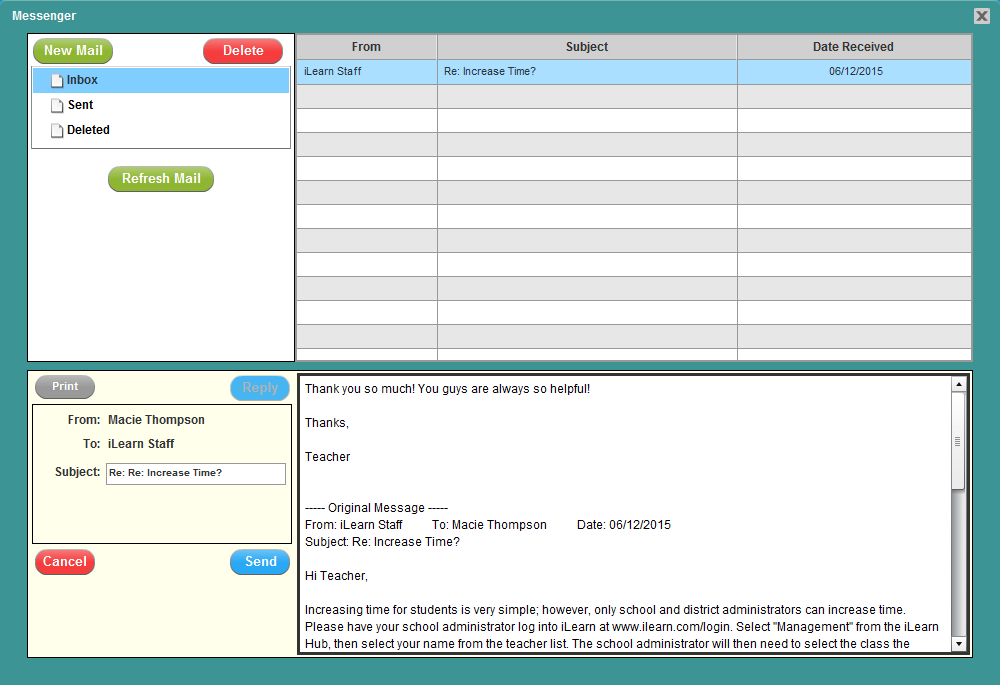
Teachers also have access to the iLearn Messenger. In the iLearn Messenger, teachers can send quick communications to iLearn Support staff, to an entire class of students, or to individual students in a class. They can also receive and reply to messages from students or iLearn Support Staff.

The iKnow Manager allows educators (district and school administrators and teachers) to create iKnow Math assessments and assign them to students. District administrators can assign to all students in a district, school administrators can assign to all students in their school, and teachers can assign to their students. When using iKnow Benchmarks and Universal Screeners district-wide, we strongly recommend district administrators make one assessment across the entire district, rather than each school administrator or teacher assigning their own.

The MyQ Manager allows educators (school administrators and teachers) to assign queues of iLearn content to students. School administrators can assign to students in their school (like a school-wide assignment of the Fractions Learning Progression), and teachers can assign to their students.

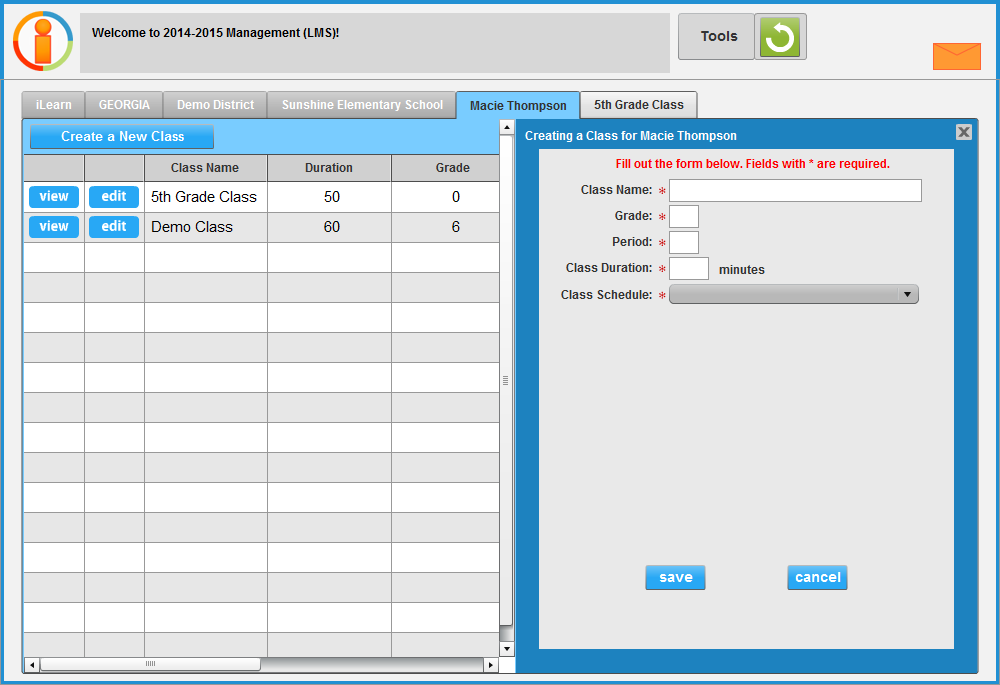
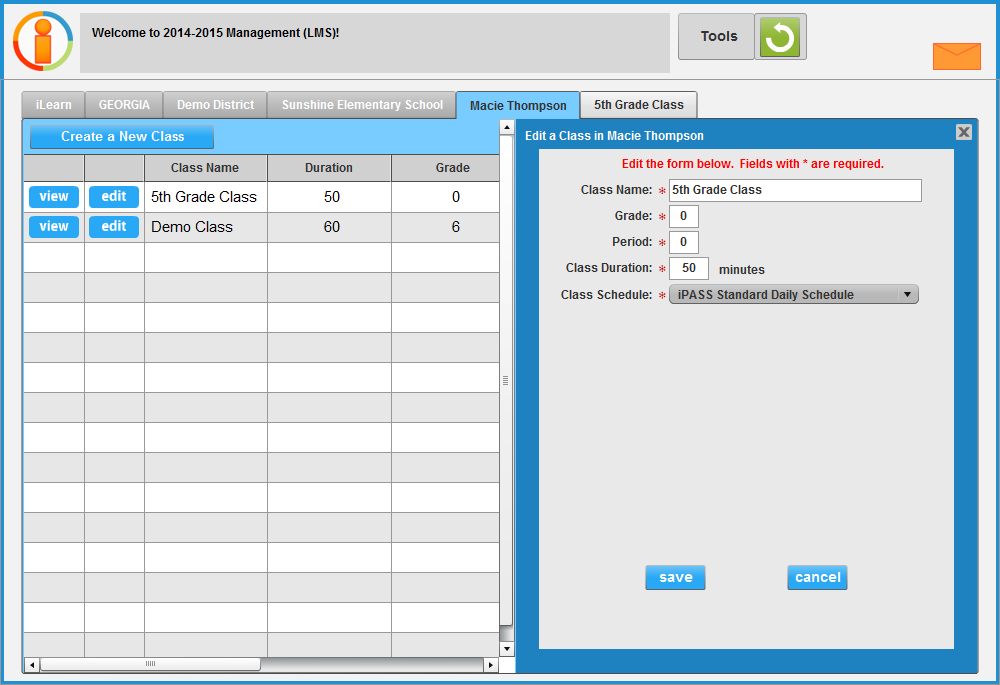
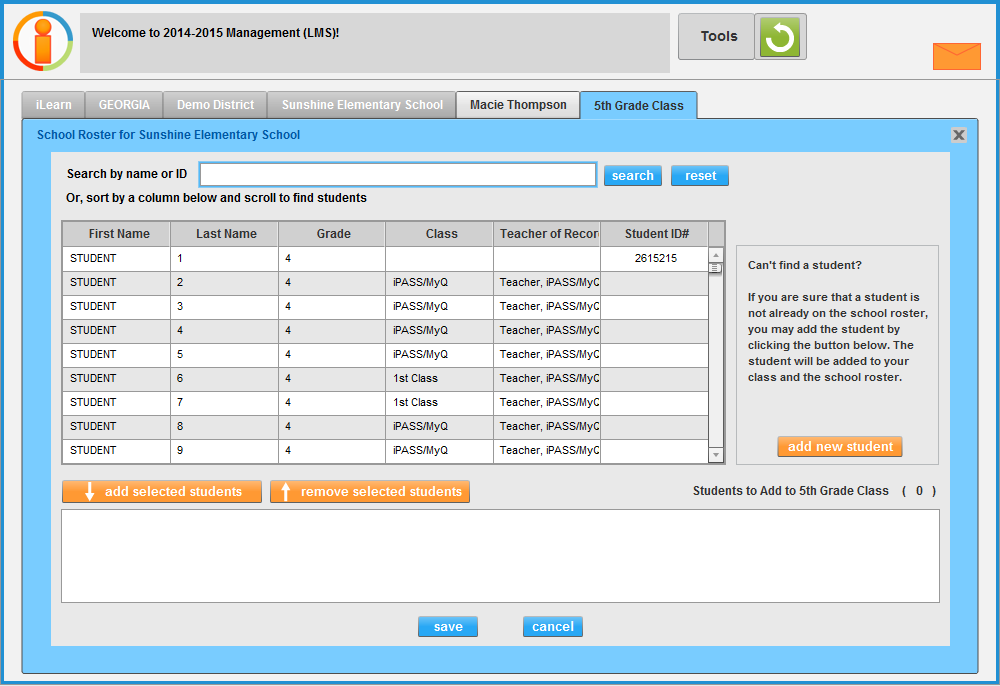
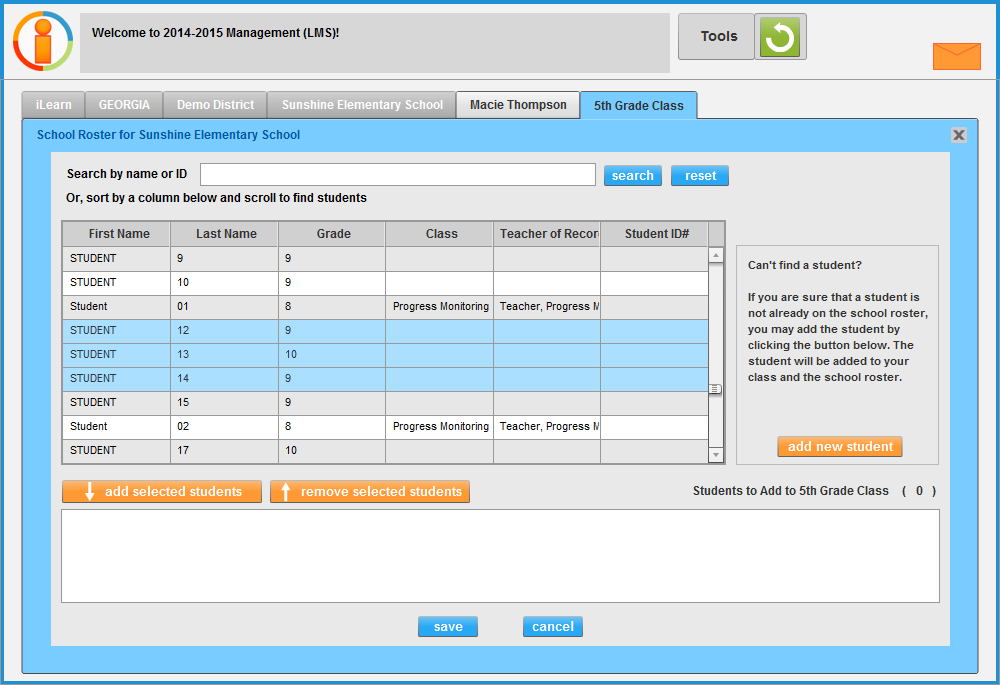
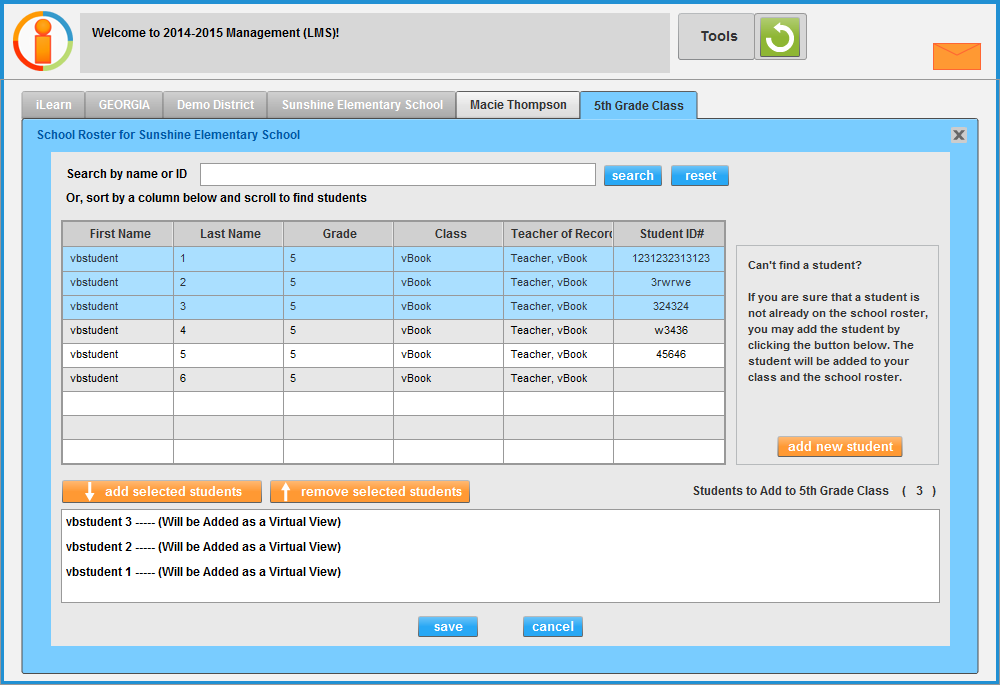
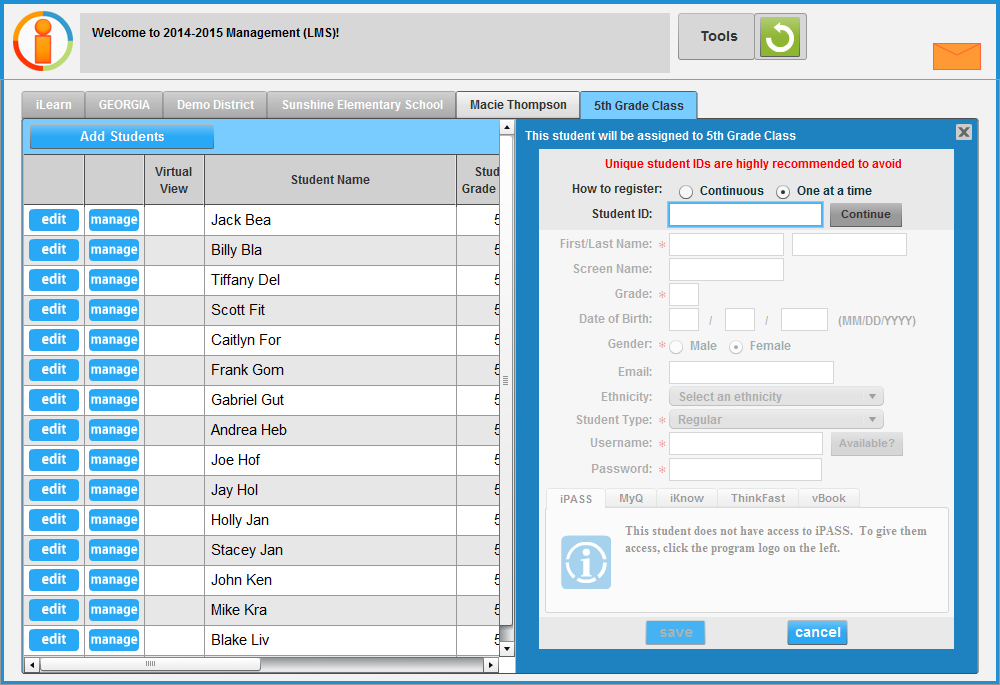
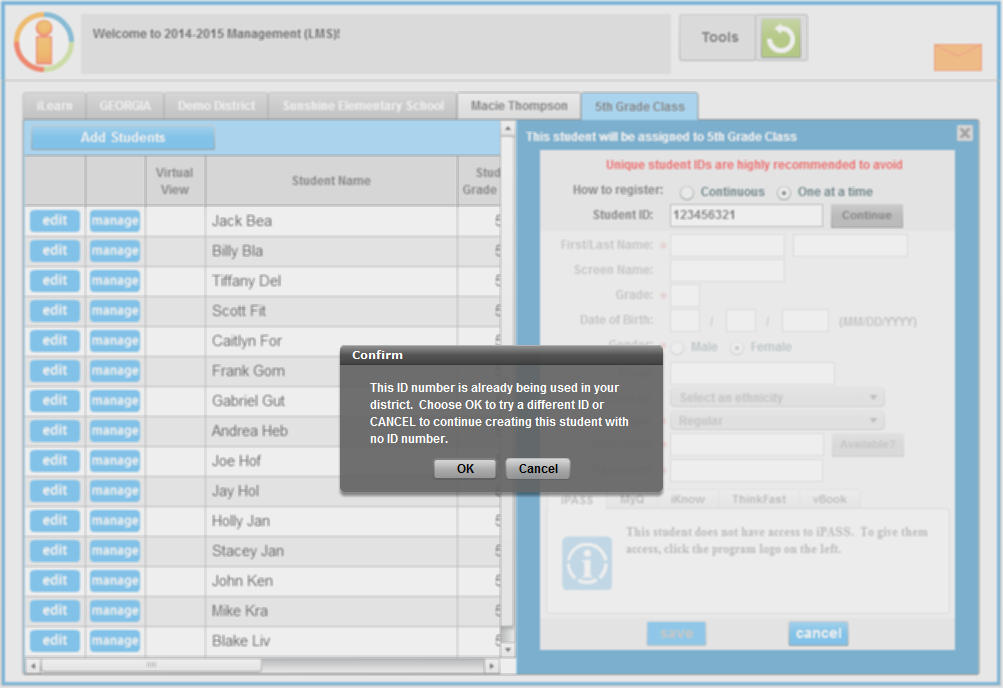
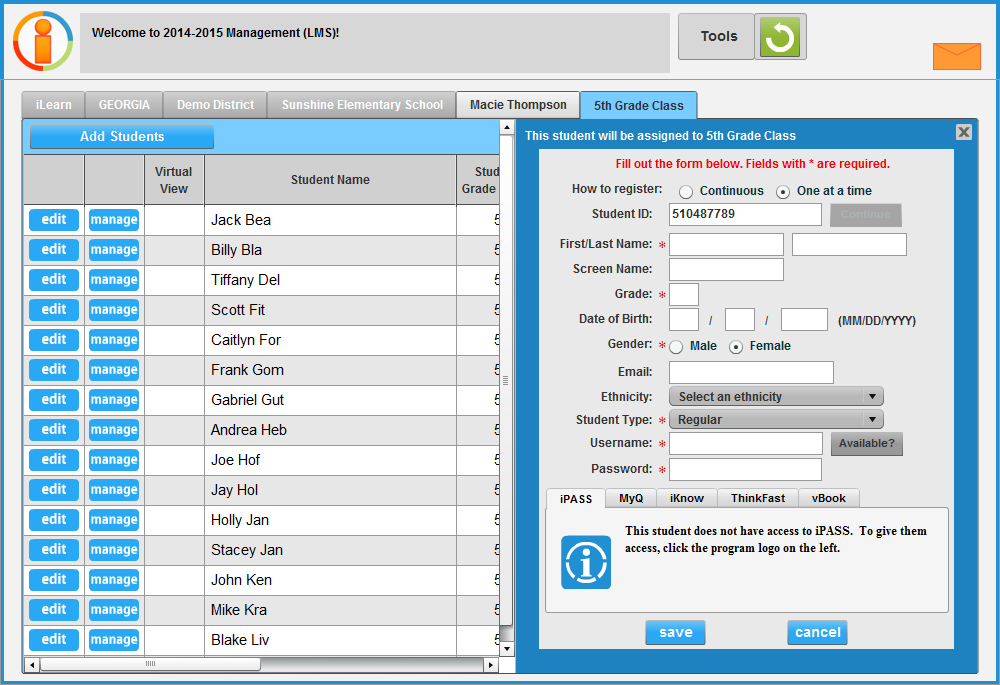
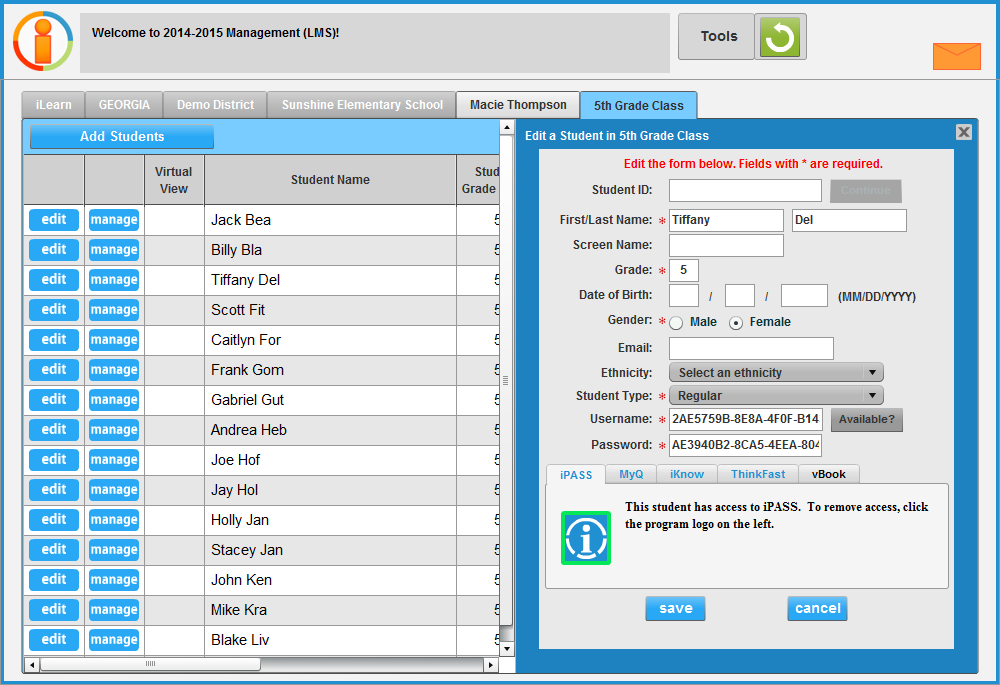
District and school administrators, and teachers all have the ability to add classes, edit classes, add students, add Virtual Views of students, edit students, and remove students.

Managing Classes and Students

The Management utility is an administrative tool to add/edit classes, add/edit/remove students, create and assign queues and assessments, and communicate with students.

District and school administrators can navigate to the teacher level. The following sections are presented in the view of a teacher, but can be accessed by district and school administrators by navigating to the teacher level by clicking the “View” buttons next to school and teacher.


Add a New Class

Opening Management, a teacher views any existing classes.

LMS Teacher Tab Teacher View

At the top of the list, click LMS Create Class icon.

LMS Create a New Class Teacher View

To create a new class, enter the class name, the grade level of students (it’s OK to have students at differing grade levels in a class – just enter a representative grade), the class period, the class duration, and a class schedule. The class information will NOT determine any options for students in the class; rather, the class information is suggested to help teachers, school and district administrators manage classes.

Click LMS Save icon at the bottom to create the class.


Editing a Class

While class information does not determine any options for students in the class, it is important that the class information is accurate so educators can effectively manage their classes. To edit class information, click LMS Edit icon next to a class name.

LMS Edit a Class Teacher View

The existing information for the class displays, and you can edit any available fields.

Click LMS Save icon at the bottom to save all changes.


Add a NEW Student

Adding students to a class is simple. On the list of classes, click LMS View icon next to the class.

LMS Teacher Tab Teacher View

If the class already includes students, they display as shown below:

LMS Class Tab Teacher View

If the class does not have students, “No Record” will display as shown below:

LMS Class Tab with no students Teacher View

At the top of the list of students click LMS Add Student icon.

LMS Add Students Teacher View

This opens the School Roster utility that displays the students registered in the school. This is so teachers can easily find already registered students to add.

If a student already has an account, the student likely has a Teacher of Record listed. If so, when you add the student to the class you’ll add a “Virtual View” of the student account. If the student does not have a Teacher of Record, the student can added to the class and you will become the Teacher of Record.

LMS Add Students Teacher View with students selected

The highlighted students above display neither a Class nor a Teacher of Record. Since no Teacher of Record is listed, these students can be added to the class, and the teacher will become the Teacher of Record.

The students not highlighted above display both a Class and a Teacher of Record. Since these students have a Teacher of Record, you can add a Virtual View of the student accounts to your class.

Teachers can find students in two ways:
  1. Search for the student – enter a search criterion and click to search.
    LMS Add Students Search Bar Teacher View
    1. iLearn suggests entering the student ID, as they are likely to be unique. If a student cannot be found by searching for the student ID, or even a portion of the Student ID, search for the student name.
      1. Search by student first name, or first three letters of the student last name, or grade level, class name, Teacher of Record, or student ID.
    2. Click LMS View icon if the search does not produce the desired results. This resets the list to the entire school roster.
  2. Sort columns and scroll through the roster - click a column name to sort the school roster by that column. Scroll through the list to find the student.

If the student to be added is on the roster, click the student and then click LMS Add Selected Students icon (or, double click the student).

LMS Add Students with selected students added Teacher View

The student is added to the box at the bottom. Click LMS Save icon to add the student to your class.

If you cannot find the student on the school roster, the student may not already be registered in iLearn. Click LMS Add Selected Students icon on the right to create a new student account. If the student can log in, however, they could be in another school in the district and not appearing your school’s roster.

Important: To eliminate the possibility of duplicate student accounts, educators should always search for the student first. If the student cannot be located in the school roster, check with your school or district administrator to make sure the student does not have an account at another school in the district. If the student has accessed iLearn in the current school year, they already have an account and are likely listed at some school. If the student used iLearn in the current year but in a different school in the same district, a district administrator can move the student to your school or directly to your class. If the student has used iLearn in the current school year, but at another district you should contact iLearn Implementation to have the student moved. Students should not have multiple accounts.

After verifying the student is not on the roster and does not have an iLearn login, click LMS Add Selected Students icon , to create a new student account.

LMS Add New Student Teacher View

The first action to adding a new student is entering a student ID. Student IDs are important for educators to easily manage students. Student IDs also prevent students from receiving two iLearn accounts. The student ID should be a similar ID to all other students registered. For example, if all other students registered are registered with state IDs, new students should be set up with a state ID; if all other students are registered with district IDs, new students should be set up with a district ID. If the student does not yet have a student ID, click “Continue” to create the account for the student without a student ID. It is important, however, to remember that the student was created without a student ID, and to enter the student ID when it is known or issued.

LMS Add New Student Duplicate ID Error Message

A message notifies you if the ID is already being used in the district. If this message displays but you were unable to find the student in the school roster, contact your district or school administrator to have the student moved to your school or class.

If the ID is not in use, continue entering the student account.

LMS Add New Student Teacher View

Enter the student’s first name, their last name, and their enrolled grade level. Important: Grade level determines iKnow Math assessments and other program decisions, so it is important to enter their currently enrolled grade level. Date of birth, gender, ethnicity, and student type will not determine any settings for the student’s iLearn account. However, they may be useful in managing students.

Enter a username for the student. All iLearn usernames must be unique. iLearn does not recommend common usernames such as “jsmith” because these usernames are likely in use. Usernames such as the student’s first letter of their first name, first letter of their last name, and a segment of their student ID are more likely to be unique and secure.

Usernames must be 4-20 characters and cannot contain special characters (for example: !@#$%^&*()-=+/><’;:][\). Click LMS Username Available icon to verify a username you entered is available. If a username is already in use, enter a different username. Each username must be unique.

Passwords must be 4-20 characters and cannot contain special characters (for example: !@#$%^&*()-=+/><’;:][\). Passwords do not have to be unique, but we suggest passwords that prevent students from guessing those of others. If all usernames in a class are set up in the same way (like “jsmith” and all passwords are the same like “candy,” students can easily crack the code and log in with another student’s account (you’ll see “Login Errors” displayed on student screens in class when this happens).

Prevent this by utilizing the student’s ID, lunchroom number, or some other number the student knows in the password.

To give the student program access, click each desired program tab(s) and click the check box. If you do not wish a student to have access to a program, do not click the check box.

Click LMS Save icon at the bottom to save the new student account. After adding a new student, you can add another new student or return to the list of students.


Adding a Virtual View to a Class

When adding a student that is on the roster already, the student probably has a Teacher of Record listed, and in this case you add a “Virtual View” to the class.

A Virtual View allows a teacher who is not the student’s Teacher of Record to add a student to their class. A teacher can be the Teacher of Record for some students in a class, and can also have Virtual Views of some students for whom she is not the Teacher of Record. So, a class can include both and a separate class is not needed for Virtual Views. Teachers who need a student to appear in two of their classes can be the Teacher of Record for a student in one class, and add a Virtual View for same student to another class.

To create a Virtual View, click LMS View icon next to the class name under which the Virtual View needs to be added.

LMS Class Tab Teacher View

Click LMS Add Student icon at the top of the student list, to display the school roster.

LMS Class Tab Teacher View

Teachers can find students in two ways:
  1. Search for the student – enter a search criterion and click to search.
    LMS Add Students Search Bar Teacher View
    1. iLearn suggests entering the student ID, as they are likely to be unique. If a student cannot be found by searching for the student ID, or even a portion of the Student ID, search for the student name.
      1. Search by student first name, or first three letters of the student last name, or grade level, class name, Teacher of Record, or student ID.
    2. Click LMS View icon if the search does not produce the desired results. This resets the list to the entire school roster.
  2. Sort columns and scroll through the roster - click a column name to sort the school roster by that column. Scroll through the list to find the student.

If the student to be added is on the roster, click the student and then click LMS Add Selected Students icon (or, double click the student).

LMS Add Students with selected students added Teacher View

The student or students selected will display at the bottom. In parenthesis text states “(Will be Added as a Virtual View).”

Click LMS Save icon at the bottom to save the student(s) as a Virtual View.

Virtual Views display with a green indicator next to their name in the Virtual View column. This means the student appears in your class as a Virtual View and that you are not the Teacher of Record.

LMS Class Tab Teacher View


Editing a Student Account

Only the Teacher of Record can edit a student account. To edit, click LMS Edit icon next to the student’s name.

LMS Edit Student Teacher View

All information for the student’s account displays. Edit the appropriate fields and click LMS Save icon to save any changes.


Editing a Virtual View

There can be two types of Virtual Views:
  1. A Virtual View with a different Teacher of Record – the student is in a class under the Teacher of Record, and the student also has a Virtual View in a class under a different teacher.
  2. A Virtual View with the same Teacher of Record - the student is in a class under the Teacher of Record, and has a Virtual View in a class under the same teacher.

In the second case, the Virtual View could have been added because the student is in two of the same teacher’s math classes.

In the first case, the teacher cannot edit the Virtual View of the student account. The Virtual View cannot be edited because the teacher is not the Teacher of Record.

In the second case, if the teacher clicks LMS Edit icon next to the student’s name, the teacher can edit student options because the teacher IS the Teacher of Record.

Teachers who are not the Teacher of Record for a student cannot edit the student’s account because they do not have primary responsibility for the student. To edit the student account, contact the Teacher of Record. The Teacher of Record is displayed in the message, and can also be identified on the student roster after clicking the “Add Students” button and locating the student.


Removing a Student

Next to a student’s name click LMS Remove icon.

LMS Remove Student Teacher View

A Teacher of Record can remove a student and no longer be the Teacher of Record for that student. Removing a student will have two options:
  • With Access
  • No Access

Students who are removed With Access can continue in iLearn without a Teacher of Record. Use this option when the student is transferring from one teacher to another in the same school. The other teacher can add the student to their class later using the Add Student utility and will become that student’s Teacher of Record. Teachers are integral to learning, and learning in iLearn programs. As such, we strongly recommend that students have a Teacher of Record at all times.

Students who are removed No Access cannot continue in iLearn. Upon logging in, the student will have no active programs on the iLearn Hub. Use this option if the student leaves the school/district, or no longer needs access. The student can regain access when another teacher adds the student to their class and becomes the student’s Teacher of Record.

Choosing the option to “Move to a Different Class” under the same teacher opens the utility below:

LMS Remove Student Teacher View

The teacher chooses another of their classes from the “Select a Class” menu, and then clicks LMS Move icon . Since the student is moving from one class to another under the same teacher, the teacher remains the Teacher of Record for the student.


Removing a Virtual View

Next to a Virtual View click LMS Remove icon.

The teacher is prompted to confirm removing the Virtual View.

LMS Remove Virtual View Student Teacher View

Click OK to remove, or click Cancel. If a Virtual View is accidentally removed, the teacher can simply use the Add Student utility to add another Virtual View of the same student.

Messenger

The iLearn Messenger is now available for communication between teachers and students, and between teachers and iLearn Staff.

Teachers may have used the messenger system to communicate with iLearn in the past. Now teachers can also send messages to all students in a class or a specific student. Students can also communicate with their teacher.


Accessing the Messenger

The Messenger is available to all iLearn students and teachers. To access, log in at www.ilearn.com/login

and click the envelope iLearn Hub Envelope icon in the upper left. Teachers can also access the Messenger in the Management utility by clicking Tools in the upper right, and then selecting Messenger.

iLearn Hub Page Teacher View

Click Inbox to review messages you’ve received, Sent to review messages you’ve sent, or Deleted to review messages you’ve deleted.

LMS Messenger Home Screen Teacher View


Send a New Message

Click Messenger New Message icon to send a new message.

LMS Messenger New Message Screen Teacher View

Select either iLearn Staff, A Class, or A Student from the “Send To:” box.
  • iLearn Staff – after selecting “iLearn Staff” a “Reason” drop down box displays. Select a reason for the communication, then type a subject and your message.
  • A Class – after selecting “A Class,” choose your class. Type a subject and your message to all the students in a class. To send to another class, highlight and copy your message to paste into the new message.
  • A Student – after selecting “A Student,” select the class, then the student and type your subject and message. Then, click Messenger Send Message icon.

LMS Messenger Typed New Message Screen Teacher View


Replying to Messages

Messages you received display in the Inbox.

LMS Messenger Homescreen with Message Teacher View

Messages in bold are new, unread messages. Click a message to open and read.

LMS Messenger Message Reply Teacher View

Reply to a message by clicking Messenger Reply Message icon.

LMS Messenger Message Reply Teacher View

Remember to click Messenger Send Message icon when you’ve finished typing your message.

If you send a message to a class of students or one student, they will see a new message notification on the iLearn Hub after logging in. Each student can view the message and reply.


Students and the Messenger

Students will also have access to the Messenger.

iLearn Hub Page Student View

Students can send messages to their teacher by clicking iLearn Hub Envelope icon on the iLearn Hub, then selecting Messenger New Message icon in the Messenger utility.

LMS Messenger New Message Screen Student View

If the student has a Virtual View under another teacher, the student will also see that teacher’s name in the “Send To:” field.

The student types a subject and their message, then clicks Messenger Send Message icon.

MyQ and iKnow Math Managers

Both the MyQ and iKnow Math Managers are in the Management utility under “Tools” at the top.

Navigate to the MyQ section on the iSupport K-12 site to learn how to create and assign MyQ queues.

Navigate to the iKnow section on the iSupport K-12 site to learn how to create and assign iKnow assessments.


Moving Students

Throughout the school year, students may move from teacher to teacher in the same school, or from school to school in the same district. These students can be moved quickly by school and district administrators.

Only school and district administrators have access to the Move Students utility. Teachers can now add students and Virtual Views to their classes, and can remove them. The Move Students utility is now primarily for when students move from school to school within a district.


Accessing the Move Students Utility

To access the Move Student utility as either a school or district administrator, log into iLearn at www.iLearn.com/login. From the iLearn Hub, click LMS hub icon to open Management.

iLearn Hub Page Teacher View

Click Tools in the upper right, and then select “Move Students.”

LMS Move Student Selected

The Move Student utility opens:

LMS Move Student Selected

If logged in as a school administrator, only the students registered in that school will display. If a district administrator, all of the students in all the schools of the district will display.


School Admin - Move a Student

To move a student, enter and search for the student’s student ID, name, first three letters of their last name, grade, class, or Teacher of Record. Or, scroll through the roster and find the student. Having consistent student IDs across the district improves the ability for school and district administrators to quickly and easily find students.

Once the student is located, click the student then click LMS Move Student Plus icon (or double click the student).

LMS Move Student Selected

The student(s) will appear in the box in the bottom right. If a student is accidentally added to the box, click the student then click LMS Move Student Minus icon (or double click) to remove the student.

A school administrator can move students to another teacher in their school. A school administrator cannot see students in other schools.

To move a student to a new teacher, click the LMS Move Student Teacher Dropdown drop down menu, and then select the appropriate teacher. Then, click the LMS Move Student Class Dropdown drop down menu and select the appropriate class.

Once the teacher and class are selected, click LMS Move Student assign class icon.

Using the move student utility will change the Teacher of Record for any students moved. The Move Student utility cannot be used to create Virtual Views. It should only be used when a student is moving from one Teacher of Record to another.


District Admin - Move a Student

District administrators can see and move any students in the district to any school or any teacher’s class in the district.

To move a student, enter and search for the student’s student ID, name, first three letters of their last name, grade, class, or Teacher of Record. Or, scroll through the roster and find the student. Having consistent student IDs across the district improves the ability for school and district administrators to quickly and easily find students.

Once the student is located, click the student then click LMS Move Student Plus icon (or double click the student).

LMS Move Student Selected

The student(s) will appear in the box in the bottom right. If a student is accidentally added to the box, click the student then click LMS Move Student Plus icon (or double click) to remove the student.

To move a student to a new school or to another teacher in the same school, click the LMS Move Student School Dropdown drop down menu, then click LMS Move Student Teacher Dropdown , then click LMS Move Student Class Dropdown . Once the school, teacher, and class are selected click LMS Move Student assign class icon.

Using the move student utility will change the Teacher of Record for any students moved. If a student is moved out of the school, all Virtual Views are removed. The Move Student utility cannot be used to create Virtual Views. It should only be used when a student is moving from one Teacher of Record to another, or one school to another.


Removing a Student

The Move Student utility can also remove a student. In the “Select a Teacher” drop down menu, select “No Teacher of Record,” then choose “With Access” or “No Access” in the class drop down menu.
  • “With Access” allows the student to continue in iLearn without a Teacher of Record. Use this option when a student will be assigned a new Teacher of Record soon. Students should not have access to iLearn for an extended period without a Teacher of Record.
  • “No Access” disallows the student from continuing in iLearn. Use this option when the student no longer needs access to iLearn, or has moved out of the district.


Move Students Utility and Virtual Views

The Move Student utility will not display Virtual Views in the list of students, nor will the Move Student utility create Virtual Views. When a student is moved to another school any Virtual Views at the previous school are removed. New Virtual Views can be added easily at the new school, by any teacher.